
Are you looking for How To Build A Bluetooth Speaker? LessConf will help you to find the best way here!
Let’s be honest. We can not put our phones down long enough to plug them. Bluetooth to the rescue! Having a love of all things DIY, I thought I would talk about the experience and constructed my own collection. The components only cost about $35, but the price is dependent upon how you want the final product to appear.
Safety Note- I am not an audiophile or an electrician. I am simply sharing what I have managed to find out. Be smart in working on electronic equipment. Amps can take a charge even after the power is switched off.
The Way How To Build A Bluetooth speaker
[amazon bestseller=”Bluetooth Speaker” items=”10″ template=”list”]
Step 1: Milling
I constructed this boombox therefore I began by breaking my lumber into the bits. If you wished to simplify this construct, you can use sheet products like plywood or MDF, or merely purchase pre-milled timber.
I squared up to them on the jointer, planer table and table saw after cutting the planks to span in the miter saw.
I bought 6/4, or 1 1/2″ thick, thick Walnut with this construct and desired the last depth of 1/2″ on those boards, so next I had to read all my boards, essentially dividing them in half.
Step 2: Resawing
The saw blade on my bandsaw was boring, so I chose to do the majority of the resaw work. To do so, I marked the middle of this board working with a marking gauge and then place the fence so that the blade could pass through the center of the plank. Additionally, I included a feather board to keep the board.
I wished to create this cut multiple moves, so I made the move and began around an inch on the dining table with my blade. I then reversed the plank end for end, ensuring the exact same face was against the weapon, then made the pass on the opposite edge of the plank.
I repeated this process for each one the boards, subsequently lifted the blade high enough to ensure roughly 3/4″ of substance would be left at the center of the planks. I didn’t wish to cut all of the ways through in the table watched, simply eliminate the vast majority of the waste. I proceeded over into the bandsaw and repeated the measures together with the blade that was greater.
I put up another feather board in the bandsaw to keep pressure from the boards and then resawed each the boards, dividing them entirely.
In the planer, I eliminate the ridge and could find the planks flat.
I had to trim a few of the planks and eliminate some areas I did not like such as those places before gluing the panels up.
Step 3 Boards
After each the planks were cut to dimension, I ordered the planks at the orientation I thought looked best then tagged them so that I would not get them mixed up throughout the adhesive up.
The final step before the adhesive up was to combined each border, to ensure I got flawless glue lines. I used this little trick I picked up in my friend Jay Bates, in which you combined two breeding boards together with all the opposite face of every plank against the jointer fence.
You may see my pen line was confronted by me from the fence around the board then to the fence onto the board. This negated any error from the squareness of my fence and guaranteed that I wound up with a panel.
Step 4: Milling and Glue upward
Eventually I could glue the panels up. I didn’t use anything for working on those boards, largely because there were so many, and I made sure to include clamps to the ends of the seams to keep them consistent with
After letting the planks sit at the knobs to get a couple of hours, I fought off the adhesive and then handed them through the planer to have them cleaned up.
Together with the planks cleaned up, I could tear the top, bottom, and side panels to closing width in the table watched, again employing a feather board to keep consistent pressure from the fence.
I began cutting at the miters and place my blade. first, cut out a miter on one end of all those planks that made up this box’s framework.
With one end then I set up a block in my miter gauge to reduce the miter. This guaranteed that my upper and bottom panels were exactly the exact same length.
Eventually, I could glue the box up, and that I used a blend of corner straps and strap clamps. I wound up with a box and different miters, which are consistently wonderful.
Together with the box framework glued up, I could cut front and rear panels to final size dependent on the last size of this framework, and that I did that over in the miter saw.
Step 5: Speaker Holes
I had to find the speakers cut to panel the holes. The speaker kit I utilized, the C-Note kit from Parts Express, includes MDF enclosures and you may easily utilize a flush-trim piece and utilize those timers as templates to reduce those holes, but I figured I would allow the X-Carve perform the job for me.
I modeled a fast design-in Easel, Inventables’ complementary CAM applications, and also did a test cut on a bit of 1/2″ plywood to be certain everything will fit right. After I got everything matching the cut was made by me the Walnut panel. This entire operation only took approximately 13 minutes, super-fast with a 1/4″ little bit.
Following the X-Carve completed, I cut the tabs holding the leftover bits set up and then cleaned up everything using a spokeshave and some sandpaper.
Step 6: Routing
I desired to recess front and rear panels to the framework slightly, to give the panels a secure fit, so I put my router to cut a 1/2″ wide by ⅛” deep rabbet. I cut these rabbets onto all four edges of the front and rear panels, making sure to cut the rabbets on the extended edges first to assist in preventing a blowout on the grain.
next glued the front panel on the framework, and I made sure to use lots of glue and clamps for it. You are interested in having an airtight seal on speaker boxes, which means you can’t go with straps.
I knew I needed around over that was thick with the speaker box the edges on all, which would mean eliminating a piece of stuff. As a result of this, I wished to reinforce the corners and that I used some blocks to get this done.
I used a blend of glue and wood adhesive to attach the cubes, while the timber adhesive dried, and also the blocks would be essentially held by also the CA glue in place.
Additionally, I had to include some more cubes into the interior of the upper and bottom panels, and those are where the screws which attach the rear panel, I wished to be removable and will link.
Step 7: Center Divider
The final piece has been that the center divider, which I honestly forgot about. It is possible to see that I had to notch out the cubes on the top and bottom to make space for the divider, which I cut from 1/2″ Baltic Birch plywood. I made sure to use lots of glue since I needed an airtight seal.
Additionally, I had to include another rabbet into the middle of the rear panel, so it did not interfere with the center divider, and that I cut at the table saw.
I clamped the rear panel set up, pre-drilled and countersunk holes afterward inserted 1″ screws to hold the back panel in place.
Step 8: Closing Shaping
Together with the box I could proceed to get up it. To begin with I used a flush trimming bit on the router table to wash up any overhanging places on the front and rear panels, which I cut slightly oversize.
After the borders had been piled up, I swapped to some ⅜” radius round-over bit and inserted a roundover to each one the borders of this box. I am stunned at how much a gap a border profile similar to this makes, and I truly believe this roundover created the expression of the speaker.
I could put in. I simply made sure that the screw holes were straight into the cupboard and utilized a self-centering drill bit to pre-drill holes. Then I utilized 3/4″ black screws to attach the speakers and may find a wonderful shot for the social websites.
Step 9: ore
Up from the construct was that the part I had been somewhat nervous about, establishing the crossovers. This was my very first time, and there was a slew of links. You don’t understand, crossovers divide the signal between tweeter and the woofer, sending the frequencies into frequencies and the tweeters into the woofers.
These crossovers were a part of this C-Note speaker kit that I used for this project, and there are directions about the best way best to cable the crossovers. Basically, I had to connect different elements of the crossover and add wiring to attach the crossovers into the speakers in addition to the Sky.
Let us discuss the host of the week’s movie while I am soldering.
I used the Bernzomatic ST500 cordless soldering lightweight iron and ST2200T detail flashlight with this project, plus they are both ideals for use on soldering tasks. The two torches have been powered, so they are portable and cordless, ideal if you want to solder something.
Rosin core solder was utilized by me for this particular project, which has been easy to use, no regular required. Whether you’re a professional tradesman, DIYer, artisan, craft, or chef, Bernzomatic gets the ideal product for projects.
To find out more about the soldering torches, solder, and Bernzomatic’s additional products, have a look at the link at the movie description below, and thanks to Bernzomatic for sponsoring this week’s video.
After soldering the power jack into the leads in the amp board could strip the ends of the speaker cable and insert these crimp terminals to readily connect the speaker cable into the speakers.
Step 10: Drilling
With the wiring all intact, I could proceed to incorporate holes for the ports, LEDs, switches, and the carrying handle. This was clearly one of the parts of this so I needed to use a caliper to discover the drill bit size to pre-drill the holes.
Additionally, I had to use a Forstner bit on the interior of the cabinet. The majority of these parts just had a threaded region of approximately 1/4″ in length, therefore I needed to recess these holes to permit the threaded regions to protrude through the cupboard.
I added a few rubber toes into the base of the speaker cabinet to keep it when enjoying audio.
Step 11: Ports
Were to the vents on the base of the cabinet. These vents were 3/4″ in diameter, and so that I do not have a 1 3/4″ drill bit so that I had to get a bit creative.
I drilled a 1 1/4″ hole, the nearest size piece I had available, using a Forstner bit, then used the X-Carve to trim on a template. I mounted a bit in my router attached to the template and then hauled out the gap.
You could purchase the sized Forstner bit, however, I could not find one this and I believed it was a solution that is smart.
Step 12: Growing
With each, the holes drilled to the speaker cabinet would be to sand all-around 180 prep and grit for complete.
I proceeded on polyurethane because I had left to utilize up this with this project. I wiped allowing approximately 6 hours between coats dry. I adore how the grain popped amazingly.
I also secured the interior of the cupboard with spray foam, that would not be necessary if I’d used MDF or plywood to the box, but I figured this might decrease seasonal growth and contraction.
When the end dried, I could reach the final meeting of the cupboard. I needed to be certain that the panel needed an airtight seal onto the cupboard. This foam insulation was discovered by me in the house center, which was ideal for this particular build. It is peel and sticks and I made sure to run it the rabbeted areas on the back panel along all.
After the panel has been installed with screws, then a seal creates and compresses.
Step 13: Prepare & Cut Your Fabric
That I suppose it worked out very well after a couple of hours of working together with materials although I had no knowledge of tailoring. I emptied my desk, laid the fabric marked it with a balloon. Utilize some shears, for cutting the fabric!
Step14: Start from Gluing Denim into the Side Panels
For gluing the fabric to the wooden surface of my enclosure, I used a jar of contact cement. Your fabric would soak and mess up but contact cement would not.
The touch base is waterproof and bonds well with all the timber and fabric. I began by massaging contact cement onto the side panels I spread it with a paint roller. I wrapped the denim and waited for it to place after a number of hours.
Step15: Power
Considering BT unit and the amp require electricity, but we do not wish to use two power wires, one will be shared by us. This involves cutting the cable close to the plug end since both components have identical energy demands. Note- Keep track of! Attached the cut ends into the screw-in knobs on the Sky. Plug from the BT module.
Step 16: Audio
We must receive the sound over to the Sky. There’s a problem. Sharing a power supply as we did, makes! I bet you are angry at me for making that electricity wire reduce huh? Before you get angry, there is a device called a ground loop isolator which will repair the problem.
It doesn’t matter which end faces that way go right ahead and cable your GLI directly between the Bluetooth amp and unit.
When you attempt to try it, you will probably have a jumble of distinct male/female RCA, 3.5millimeter inputs, as well as bare wires which somehow will need to connect.
You can buy adapters, however, the simplest thing to do is solder the wires and clip off the ends. Every one of these kinds of cables possesses a ground wire that makes it simple to connect them, the right channel, and a channel.
Red goes to white, and crimson, floor. Ground wires are black, or bare and thicker. You may have to join grounds. That is fine! Twist them together them and wrap each in tape.
Grab your own speakers. I used. Just be certain that they are full array (maybe not tweeters or subs), and they are 4-ohm. It is going to say about the back, the number of ohms they’re. Go right ahead and attach the screw terminals on the board, along with cables to the speaker terminals.
Step 17: Testing
Now, your electronic equipment is finished. It’s possible to plug into the power, join a Bluetooth apparatus, and check it out. You will see a pop * if it ends on if you utilized the amp did. This is a negative effect of being economical! A workaround is a DP-DT toggle switch along with the amp. This will function as a button you can wait a couple of seconds to your amp before allowing the speakers, .
The Bluetooth module is shooting full-volume to your amp. It is possible to control but it might be a fantastic idea. This way you’ll be able to turn the amp volume down, and turn up the volume of the device. This will offer you the degree of sound, but with speaker’ hissing’. Consult the amp guide for how to bring a volume potentiometer.
Step 18: Enclosure
Now you get a nice speaker, then you probably would like it to look somewhat nicer than a mess of cables. I will not get into specifics here because there are a million instructions.
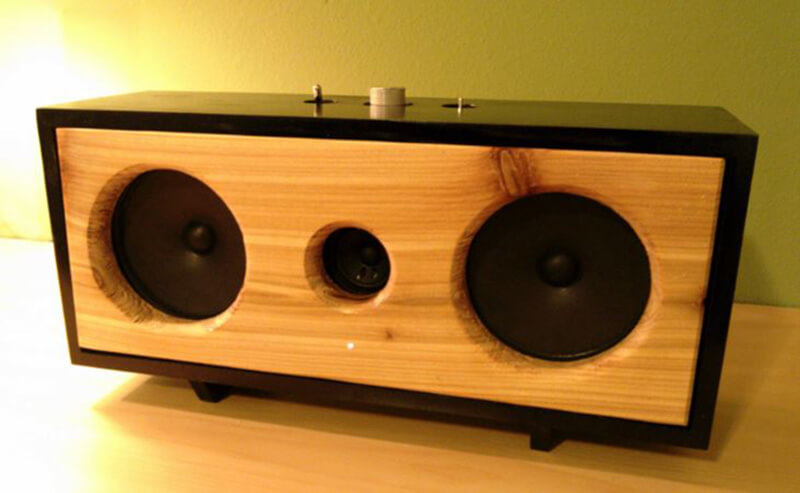
I mounted a part of cedar, painted it black, and left a simple pine box. To finish it off, I pumped the resistor recorded above facing this LED and hooked it. This offers a power indicator light.
You are now the proud owner of a Bluetooth speaker! Here’s a movie on how mine turned out:
Upgrades:
It has been about a year since this report was originally written by me and I am pleased to report I use all of the time to these speakers. I figured I would address some questions:
What is the circle? I had a tweeter so I divide the channel involving the tweeter and the speaker. I believe that it helps provide audio that is better.
Queries: I just made a box. A divider is the speakers to mount to. Then screws ran to the panel to keep on it throughout the divider. I glued triangles from the corners that were back to twist into. I would suggest exploring over I did! Airtight your box is, and materials may impact matters.
Can you put in a volume knob? Came with a wiring diagram for this can be seen as a .pdf here:
What about this power change? Only a toggle switch with the electricity cord consistent. Make sure you use one which is ranked.
What about the button that is Move? This time it is a double switch significance, although One other toggle. (two collections of on-ground-off). This is wired between the speakers and the amp outputs.
What is the sound like? It gets plenty and that I have not seen any distortion. It is not so bass-heavy because I did not use a speaker, along with the box construction was not ideal.


